Engineering Curriculum at Coronado High School: 2010 - 2014

Thursday, September 29, 2011

Example: Assembly Challenge Submission

The following is an example of what a student' Assembly Challenge blog post might look like. Use this as a reference for creating your post (hopefully you earn at least a few more puzzle piece achievements!):


I earned 3 Achievements on this challenge:

"First Assembly"


"Give Help"
I explained to Dane how to use three constraints to lock in one puzzle cube part onto another.

"Receive Help"
Tom explained how to use the dimension tool to create a perfectly square sketch for my cube part.

Wednesday, September 28, 2011

Inventor Basics: Assembly Challenge


Overview
We've learned how to make a Part in Inventor, now it's time to understand how we can combine Parts into an Assembly.

A Part is a collection of data regarding a single object. Because we're using a digital format, we can leverage the power of our computers to rapidly create multiple instances of a single object:


Constraints can be applied to lock the parts in relation to each other:


Process
• Create a part that represents a single wooden cube. Use a ruler to measure the wood cube and create the part to scale.
• Choose one of the puzzle assorted puzzle cube parts that we have in class (see examples available in image below).
• Use Inventor to create an Assembly of the chosen puzzle cube part using the single wood cube Part.
• Post a photo of the puzzle cube piece you chose to model (you may use your lap top or cell phone to capture an image) and a corresponding screenshot of your assembly.


Achievements:
Post evidence of all achievements earned to your online portfolio (click here to see an example). Tally the total number of Achievements earned and start your post with "I earned X achievements for this challenge" where X is the number you earned.
"1st Assembly" - Post a photo of a puzzle piece (use webcam or smartphone) and then a screen shot of an Inventor assembly of it.
"2nd Assembly" - Post a photo of a second puzzle piece (use webcam or smartphone) and then a screen shot of an Inventor assembly of it.
"3rd Assembly" - Post a photo of a third puzzle piece (use webcam or smartphone) and then a screen shot of an Inventor assembly of it.
"4th Assembly" - Post a photo of a fourth puzzle piece (use webcam or smartphone) and then a screen shot of an Inventor assembly of it.
"5th Assembly" - Post a photo of a fifth puzzle piece (use webcam or smartphone) and then a screen shot of an Inventor assembly of it.
"Give Help" - Help your classmates. Describe a specific case of help you gave someone else.
"Recieve Help" - Solicit and recieve help from a classmate. Describe who helped you and how.
"I'm the Assembly Master!" - Create an assembly of the monster tower of power below (this could be tough...):

Character: Grit


Perseverance and continued passion for goals seem to be as important to the achievement of long term success as talent (as measured by grades/test scores). This is an important realization for us as aspiring technical leaders.

So how can we tell where we stand with these qualities of perserverance and long term passion for goals (or in other words, "Grit")?

Angela Duckworth from the University of Pennsylvania has developed a "Grit Scale" to help gain insight on these qualities.

Please complete the following:
• 1) Use a sheet of paper to record your answers to the questions on the Grit Scale (find below).
• 2) Obtain a copy of the evaluation key and evaluate your responses. Annotate your paper with a value for each of your answers. Calculate the average scores as specified for each of the five areas: Grit, Consistency of Interest, Perseverance of Effort, Brief Grit Scale and Ambition.
• 3) Self generate feedback (+, change, ? and !) regarding the test. Specifically: Identify an area where you're strong (+), identify an area where you could improve (change), identify ideas on how you might improve in that area (!) and list a question that you have for yourself (?).
• 4) Turn in your self evaluation when complete. Your score is based on your ability to complete step 2 (average scores) and step 3 (self generate feedback).


Grit Scale
Directions for taking the Grit Scale: Please respond to the following 17 items. Be honest – there are no right or wrong answers!

1. I aim to be the best in the world at what I do.
Very much like me
Mostly like me
Somewhat like me
Not much like me
Not like me at all

2. I have overcome setbacks to conquer an important challenge.
Very much like me
Mostly like me
Somewhat like me
Not much like me
Not like me at all

3. New ideas and projects sometimes distract me from previous ones.
Very much like me
Mostly like me
Somewhat like me
Not much like me
Not like me at all

4. I am ambitious.
Very much like me
Mostly like me
Somewhat like me
Not much like me
Not like me at all

5. My interests change from year to year.
Very much like me
Mostly like me
Somewhat like me
Not much like me
Not like me at all

6. Setbacks don’t discourage me.
Very much like me
Mostly like me
Somewhat like me
Not much like me
Not like me at all

7. I have been obsessed with a certain idea or project for a short time but later lost interest.
Very much like me
Mostly like me
Somewhat like me
Not much like me
Not like me at all

8. I am a hard worker.
Very much like me
Mostly like me
Somewhat like me
Not much like me
Not like me at all

9. I often set a goal but later choose to pursue a different one.
Very much like me
Mostly like me
Somewhat like me
Not much like me
Not like me at all

10. I have difficulty maintaining my focus on projects that take more than a few months to complete.
Very much like me
Mostly like me
Somewhat like me
Not much like me
Not like me at all

11. I finish whatever I begin.
Very much like me
Mostly like me
Somewhat like me
Not much like me
Not like me at all

12. Achieving something of lasting importance is the highest goal in life.
Very much like me
Mostly like me
Somewhat like me
Not much like me
Not like me at all

13. I think achievement is overrated.
Very much like me
Mostly like me
Somewhat like me
Not much like me
Not like me at all

14. I have achieved a goal that took years of work.
Very much like me
Mostly like me
Somewhat like me
Not much like me
Not like me at all

15. I am driven to succeed.
Very much like me
Mostly like me
Somewhat like me
Not much like me
Not like me at all

16. I become interested in new pursuits every few months.
Very much like me
Mostly like me
Somewhat like me
Not much like me
Not like me at all

17. I am diligent.
Very much like me
Mostly like me
Somewhat like me
Not much like me
Not like me at all

Monday, September 26, 2011

The Deep Dive


In this activity, you will watch a group of professionals work to solve a design problem in just five days.

Copy and paste the following questions into your blog and answer them based on what you learn from watching "The Deep Dive". Use different color text for your answers to distinguish them from the questions:


1. “From the buildings in which we live and work, to the cars we drive, or the knives and forks with which we eat, everything we use was designed to create some sort of marriage between _________________ and _________________.”


2. The folks at IDEO state that they are not experts in any given area. But, they do claim to be experts on the ____________________, which they apply to the innovation of consumer products.


3. After the team of designers is brought together, told the problem, and informed they have five days to “pull it off,” what phase of the design process do they immediately engage in?


4. Give two examples of what the team members did during this phase.

a.


b.


5. List five rules-of-thumb that IDEO employees follow when they share ideas during the brainstorming phase:

a.


b.


c.


d.


e.


6. Why should wild (and sometimes crazy) ideas be entertained during the brainstorming phase?


7. After the brainstorming phase was over, the team narrowed down the hundreds of ideas by _____________ for those ideas that were not only “cool” but also _________________ in a short period of time. What phase of the design process is this called?


8. IDEO believes that the ideas and efforts of a ______________ will always be more successful than the planning of a lone genius.


9. Once the ideas were narrowed down and divided into categories, the group was split into four smaller teams. What phase(s) of the design process was each of these groups responsible for?


10. The leaders at IDEO believe that ________________ behavior and a ______________ environment are two important reasons why their employees are able to think quickly and creatively to produce innovative results.


11. Sometimes, people come up with great solutions that work by trying their ideas first, and asking for _________________ later.


12. Design is often a process of going too far and having to take a few steps back. What phase of the design process would the critique of the four mock-ups come under?


13. Upon critique of the four teams’ models, it was obvious that none of the teams had developed an optimum solution. However, the people at IDEO believe that it is important to _____________ often in order to _____________ sooner.


14. What percentage of the entire week’s time did it take to fabricate the final prototype?


15. Instead of showering his design team with a tremendous amount of praise, what did the boss require his employees to do with their new design?


16. Of all the things that we are surrounded by every day, what has not been placed through the design process?


Conclusion

1. What did you find to be the most impressive part of the team’s effort?


2. What advantages are there to having a design team with members that have non-engineering backgrounds?


3. There was a point in the process where a self-appointed group of adults stepped up, stopped the ideas, and redirected the group to break up into teams. Why was this done?


4. At the end of the video, Dave Kelly states, “Look around. The only things that are not designed are the things we find in nature.” Can you think of anything that would contradict this statement?

Friday, September 23, 2011

Product Evolution Slides


We've had some great presentations on Product Evolution in our Engineering Design classes. To help capture your experience, please post your slides to your blog.

Tip: In Power Point, save your file as an image (change the file type from .ppt to .jpg). The software will ask if you want to save a single slide or choose to save them all. Saving them all will create a folder with all your slides as images in it. Use these to post to your blog.

• Post your slides
• Arrange your slides in sequence
• At the start of the post, put your slides into context with a sentence or two summarizing your presentation (product, key moment in evolution).

Rules of the Road


We've seen some extremely creative solutions to our Moustrap Racecar Challenge.

Much like our nation's tax system, there are some clever "exploits" (loopholes) available to sharp players. These aren't "wrong" for our game, just an opportunity for motivated Engineers to create a decisive advantage in the context of the current system.

Unlike our nation's bureaucracy, we have the advantage of being a lean, agile, design focused organization. We can rapidly collaborate to optimize our game design.

With an iteration of competition complete, what Criteria (rules) would you add to the Mousetrap Racecar Challenge to help "level" the playing field?

Generate a list of at least 3 ideas and be prepared to advocate at least one of them in our next class (Monday).

Wednesday, September 21, 2011

Inventor Basics: Brick Examples

These are some examples of CAD "Bricks" made out of Inventor parts for the ED "Brick by Brick" Challenge:

4th Period Getting Ready to Race!

4th Period has been making some solid progress on getting their Mousetrap Racecars together. Here is a sampling of the teams in mid build on their designs:


Kudos to Dan. To celebrate our Inaugural Moustrap Racing Series, he had the thought to bring donuts in for the class. That's "Human Centered Design" in action! :)

The "Brick by Brick" Challenge

This challenge is an opportunity to apply what we've learned about
making Parts in Inventor
. As a "Challenge", this is an open ended, Achievement based format. Earn as many Achievements as you can. Your final score is curved against the class average.

Overview:
The Tiki Brick Co. is looking to create a digital design archive of their legacy brick products.

Criteria:
Create 3D digital parts of the below Brick designs.

Constraints:
• 3D parts will be rendered using our Autodesk Inventor software
• All work must be your own but you are encouraged to collaborate with your classmates for pointers/advice.
• Save your files for future reference.


Achievements (These are how you earn points!):
• Create a post titled The "Brick by Brick" Challenge
• At the top of the post, list the number of Achievements you've earned ("Total Achievements Earned = X")
• Write a one or two sentence summary regarding making parts in Inventor (your blog is an online portfolio/reference so provide context for readers from outside of our course).
• Justify each Achievement you've earned. Post the title of the Achievement and an image of your part (use the main menu in inventor to save an image of each part you complete).
• We're just learning the basics of making parts so we're not yet focused on using exact measurements in our designs. Your parts must be roughly proportional (correct number of faces/curves, similar proportions) to the Bricks in question. If there is any doubt, we'll put it to a jury of your peers. Your instructor has the final verdict. Don't worry about texture details, we're just looking at the shapes of the product.


Achievement - The "Basic" Brick
A straightforward part shape to start with. Click here to see an example Inventor Part.


Achievement - The "T-Bone" Brick
This shape adds a few more sides to the basic brick. Click here to see an example Inventor Part.


Achievement - The "Axe Head" Brick
Now we'll experiment with using curves.


Achievement - The "Tri-Pole" Brick
More complexity with our curved shape.


Achievement - The "MC Escher" Brick
Can you figure out something like this?!


Achievement - The "Make Your Own" Brick
Use Inventor to design your own Brick. Post an image of the result.

Achievement - "Seek Help"
Ask a classmate for help. To earn the achievement list who helped you and what they helped you with.

Achievement - "Lend a Helping Hand"
Lend help to a classmate. To earn the achievement list who you helped and what you helped them with.

Inventor Basics: Making Parts


In our Inventor software, a "Part" is the basic building block one uses to put together a more complex design. Once you've created one or more parts, you may put them together into an "Assembly".

We will review the process of creating an Inventor part in class today.


If you need to review how to make a part, here are some useful links:

Click here to follow a step by step tutorial on making a part in Inventor

Here is the first in a series of youtube videos that demonstrates how to make sketches, which are then extruded into a 3D shape.

Tuesday, September 20, 2011

West Point Bridge Designer (WPBD) Challenge


This is a department wide challenge available for any Engineering student to participate in. Rather than devoting specific in class time for this event, it's an ongoing game that is an approved activity whenever you've completed your current coursework. Engage with this in place of non-engineering related activities.

The Challenge:
Build the cheapest bridge possible that successfully spans the gap (Your bridge must not only stand under its own weight, it must also support the weight of the test vehicle).

How To Get Started:
Click on the West Point Bridge Designer icon on your desktop to get the software going (If you are unable to find the icon, search for the software the traditional way using start>program files):


Proceed through each setup step to reach the bridge editor:


Build and test your bridge. The key way to reduce cost is by changing your bridge members to the smallest members possible. This is an "iterative" process. Fail early and fail often!

Achievements
You may earn the following Achievements. These are worth extra credit. Justification for each Achievement (screenshots and text explanation) should be compiled into a single post on your blog (remember, you can edit and update blog post to keep it current). You may be required to verify any results so keep copies of your files:

"Build it" (1pt) - Build a functional bridge. Display a screen shot and list the total cost. List one feedback item for each of our four feedback areas for this design (+, change, ?, !).

"My Best Result" (1pt) - Post your best result and your period in the comments section of this post.

"Best in Class" (1pt) - The best score posted in the comments section from each period may earn this Achievement.

"Best Bridge" (1pt) - The best score overall from any course posted in the comments section earns this Achievement.

Be In Here!

(Generaly speaking), it pays to volunteer to go first/early when a group of people have to present. Your audience has less of an expectation and greater level of attention.

Monday, September 19, 2011

Simple Machine Challenge pt I - Mousetrap Racecars!


We've learned about a number of simple machines in the Principles of Engineering courses. A common theme amongst these devices is the concept of using mechanical advantage to trade force for distance or distance for force. How can we use this trade off in context in the classroom?

For this challenge you and a team mate will design, build and compete with a Mousetrap racecar. Specifically, you will use a third class lever and a wheel and axle simple machine to prototype a race vehicle.


Criteria:
Design, build and compete with a Mousetrap Racecar (A "car" uses at least two axles).
Maintain a clean workspace.

Constraints:
One mousetrap
No more than 12" of masking tape
Fischertechnique robotics parts
No more than 24" of string
You must work through the stages of the event (see Achievements below)
Additional materials by Instructor approval


Achievements (by stage):
Post your results for the Simple Machine Challenge pt I to your blog. Tally your total number of Achievements earned and justify each within the post. Your grade is the total number of Achievements you earn curved against the number of Achievements your classmates earn.


Design:
"Brainiac" - Brainstorm solutions for your design. Generate a list of at least 10 ideas/concepts.
"Visualize It!" - Create a sketch of a design and label key features.


Build:
"Build It" - Build your design. Document it with a photo.
"The Price of Glory" - If each part you use costs $1, generate a total cost for your build (This info will be used to generate "cost" data to add a pricing element to the game next year).

Test (Compete):
Each car will compete on its own. Everyone will take 3 turns and use their best result. Cars are evaluated on acceleration and total distance covered. Generate your design accordingly.

"Competitor" - Compete in the 2nd Annual Mousetrap Racecar Challenge.

"Long Distance Winner!" - Travel the furthest in the race.
"Going the Mile!" - Travel the furthest or second furthest in the race.

"Led Foot" - Be the team with the fastest time covering the first 24" of the track.
"Heavy Foot" - Be the team with the fastest or second fastest time to cover the first 24" of the track.

"Feedback" - Collect feedback (at least one each of +, change, ? and !) from yourself or your classmates.


Iterate:
"Re-work" - Change your build based on your experience with the race/feedback you collected. Document any changes.
"Game Changer" - Develop a new rule or change to the game that you feel would make the event better. Explain your concept.
"Name it" - Invent a name for an achievement that you think is better than what we have currently.


Clean Up:
"Leave It Cleaner Than You Found It" - Did you leave your workspace cleaner than you found it? Explain.


Reflection:
"Design/Build" - What is a "Design/Build" process? How did your experience with this challenge relate to that? Why might you experience this in a career related to technical innovation?


There may be an option to compete again (with the same or new rules) depending on the input we receive from the teams and the timeliness with which we complete the event.

Sunday, September 18, 2011

Professional Interview

A primary objective of the Principles of Engineering course is to give our students a perspective on the different fields of engineering one could persue beyond High School. What better way to work towards this awareness than to conduct an interview with an engineer?

A selection of interesting people with engineering backgrounds. How many of these people can you name?:


Overview
Conduct a personal interview with a professional in the field of engineering, engineering technology, or another high-tech, high-demand field. Interview documentation must follow the outline format described below and consists of three major components: Professional Background; Interview; Interviewer Reflection. Completed interview documentation must be posted to your online portfolio (blog).


1. Discuss with your instructor who you would like to interview. Obtain instructor approval.

2. Contact the person you will be interviewing and obtain consent.


Professional Background

3. Gather the information below. Use the buddy system for all interviews. No interviews are to be conducted in private

a. Interviewee name:

b. Interviewee’s specific degree:

c. Interviewee’s place of employment:

d. Interviewee’s email address and/or phone:


Professional Interview

4. Ask interviewee the questions listed below and record exact responses in your engineering notebook. If you wish to ask additional questions, seek instructor approval.

· Please describe your engineering field.


· What is your current job title?


· Please describe your particular job and duties.


· What is your average work schedule?


· Starting with high school, describe your educational background chronologically.


· If you had it to do over, related to your career or education, would you do anything differently?


· What advice would you give to me as someone interested in pursuing a career path similar to yours?


Personal Reflection

5. Reflect on your completed interview and answer the following questions. You may also add additional reflections or thoughts.

a. What surprised you the most about the interview?

b. What was the most important piece of information that you learned form the interview?

c. How has this interview influenced your feelings about your future career?

Wednesday, September 14, 2011

Student Blog Links: 6th Period


6th Period - please comment on this blog post with your blog title and blog url listed. I will use these addresses to make a list of class links on the right sidebar. Thanks!

As an example:
"Hi 6th Period! Hi Mr. Olson!
My blog is called Creative Problem Solvers!
The url is www.creativeproblemsolvers.blogspot.com"

Student Blog Links: 5th Period


5th Period - please comment on this blog post with your blog title and blog url listed. I will use these addresses to make a list of class links on the right sidebar. Thanks!

As an example:
"Hi 5th Period! Hi Mr. Olson!
My blog is called Creative Problem Solvers!
The url is www.creativeproblemsolvers.blogspot.com"

Student Blog Links: 4th Period


4th Period - please comment on this blog post with your blog title and blog url listed. I will use these addresses to make a list of class links on the right sidebar. Thanks!

As an example:
"Hi 4th Period! Hi Mr. Olson!
My blog is called Creative Problem Solvers!
The url is www.creativeproblemsolvers.blogspot.com"

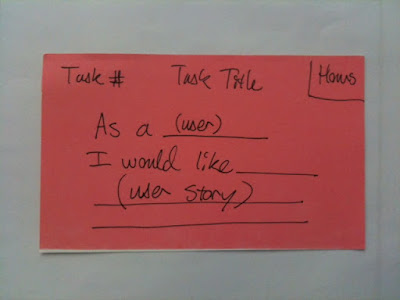
Scrum Task Card v1.0

We're going to use an agile development methodology called Scrum for our Engineering Projects course.

The process involves tracking progress on tasks on a team board. We'll try the following format for our Task/User Story Cards. This format may change based on our experience in the process:

Tuesday, September 13, 2011

"I'm Sorry Dave, I'm Afraid I Can't Do That..."


This is a follow on for when we get back to programming next. We can continue from where we were with our "Hello World!" C++ program and modify it to replicate the best artificial intelligence that our space program can buy.

Challenge:
Craft a program that functions like the frustratingly perfect HAL 9000 from Stanly Kubric's seminal movie 2001.

Specifically:
(1pt) - Prompt the user to enter their name (see tips below)
(1pt) - Ask the user what they'd like to have HAL 9000 do and always reply with "I'm sorry (name entered), I'm afraid I can't do that"


A few thoughts that might help out:

Google C++ cin to understand how you can use the cin command to input text.

Before the main () function with the other #include place the following:
#include <string>

Inside the main () function you could use the following:
string user_input; //creates a string (text) variable named "user_input"
getline(cin, user_input); //the getline function can be used to enter a string (text) for the user_input variable

My First Blog Post!


We're getting all of our 2011-2012 students set up with their blogs. These will serve as an online portfolio of your engineering experiences.

Please Complete the following to make your blog:
1) Sign in to your Google account. Create one at www.google.com if you don't already have one.
2) Create a blog through www.blogger.com
3) Name your blog. Choose any school appropriate name that you like for your online portfolio. Since this is something that we hope will serve as a reference, please choose a title/web address appropriate to include on a resume. Consider the use of words like "Engineering", "Design", "Problem Solving", your name, etc.


Assignment for your first Post:
1) Title your post "My First Blog Post!"
2) Type some text greeting people that visit your blog.
3) Insert a photo of something you're interested in (hobby, sports team, technology, etc.)
4) Include a sentance or two of text before or after the photo explaining your interest.
5) Insert a link relavent to the photo.
6) Use the spell check feature to check your spelling.
7) Make sure your post is formated in a presentable way.
8) Add a Label to the post

Monday, September 12, 2011

Emergency Preparedness!


Thursday's county wide blackout and Sunday's 10 year anniversary of September 11th are powerful reminders that large scale emergencies can happen without warning. As designers, we will consider ways that we can be better prepared for life's unexpected events. This activity serves as an opportunity to apply the PLTW 12-step design process that is part of our Engineering and Design curriculum.


Task:
Use the 12-step Design Process discussed in class to develop an Emergency Preparedness Plan. Define the problem, brainstorm solutions, create a prototype, generate user feedback and then readjust your solution.


Criteria:
Prepare a list of essential items your family would like to have on hand for an emergency situation.
You may collaborate with your classmates in developing your plan.
Each student will prepare their own list.

Constraints:
Items required for the plan/list must be affordable for your family.


Assignment: Emergency Preparedness Supply List (5pts)
Prepare and complete the following on your blog. Ensure your product is organized and professional:

Define the Problem (1pt) - What types of emergency situations might you and your family need supplies for? Include an image at the top of your post related to one of them. List at least 3 types of emergencies you want to consider for your list.

Brainstorm Ideas (1pt) - List at least 20 ideas for supplies you could use for the given emergencies (number your ideas). Get input from at least one other student (list student next to any ideas they shared). Remember the rules of brainstorming is that there are no rules.

Generate a Solution (1pt) - Given the constraints listed above, generate a list of supplies for you and your family.

Solicit Feedback (1pt) - Get specific "+, delta, ? and !" feedback from your family. List who shared what input with you.

Refine your Solution (1pt) - Adjust your plan based on your feedback. Cite a specific change based on each category of feedback (+, delta, ? and !).

Monday, September 5, 2011

Sunday, September 4, 2011

Robotic Assembly Line Class Challenge!


The Engineering Projects class will construct a modular assembly line to simulate the marking and preparation for shipment of a product. This challenge is team based and each team must collaborate both amongst themselves and with the other teams in the class to achieve success. Formal and informal leadership opportunities will present themselves over the course of this experience.


Snake-eyes Dice Inc. is looking to improve their manufacturing process. Lean Six-Sigma consultants have identified their dice marking and shipment process as being a major contributor to inefficiency. Snake-eyes Dice has hired our class to design, prototype and test an assembly line based solution for them.


Challenge:
The class will simulate the marking of each side of a dice using an assembly line process. Once the dice are marked they'll be arranged for shipment in groups of 6.

Criteria:
Each section of the assembly line will perform one of the following roles and be completed by a seperate team in the class:
-Dispense simulated "dice" individually from a group for marking
-Mark the "1" side
-Mark the "2" side
-Mark the "3" side
-Mark the "4" side
-Mark the "5" side
-Mark the "6" side
-Arrange simulated dice for shipment as a group of 6
"Markings" may be approximations based on our material constraints.
All eight of the assembly line sections must function together to complete the job.


Constraints:
-All processes will be automated and controlled by software.
-Fischertechnik robotics kit parts will be used to implement the hardware solution.
-Ask Mr. Olson for approval of any marking solutions proposed.
-Programming will be done in the RoboPro visual programing environment.
-Each step of the process must occur on its own section of the assembly line (this is a team event!).
-Each "Dice" will be simulated by a 2x2x2 puzzle cube piece (1.5" x 1.5" x 1.5").
-Once the class challenge has been completed, two regular periods or one block day will be allowed to clean/organize the room and complete your portfolio entry.


Grading:
We will use an open ended achievement based grading system.

A class average of student achievement scores will be determined. For the Projects course, the total score in Edline for this challenge will be set so that the average score earns an A- (You're returning students and I'm challenging you with above average material hence a higher grade for average work). For example, if the average number of achievements earned is 9, then the challenge will be listed out of 10 in Edline. Grades will be capped at 110% of the total score (exceptional achievement will garner extra credit but not to the point of unbalancing the remainder of the Semester :) )


Achievements:
You must display evidence in your online portfolio of having completed the achievement in order to score them. The total number of Achievements that you earn is your score for this challenge.


Class Achievements:
"Implementation" - Implement an assembly line system that meets the criteria and constraints of the challenge.
"Fast!" - The system is able to complete a cycle of 6 dice in less than 1:30.
"Faster!!" - The system is able to complete a cycle of 6 dice in less than 1:00.
"Gosh Darn Fast!!!" - The system is able to complete a cycle of 6 dice in less than 0:45.
"The Clan with the Plan" - Develop a master schedule for completion of the project.
"Ninja Elite" - Meet the master schedule to the day.
"Good Enough for Government Business" - Meet the master schedule to the day or by +/- one day.
"No Half Stepping" - Complete the design and implementation phase of the challenge in less than a week.
"Don't Dilly Dally" - Complete the design and implementation phase in less than two weeks.
"Stewardship" - Return all Fischertechnik to appropriate storage upon completion of challenge. Leave the room cleaner than before the start of the game.


Team Achievements:
"Flash of Inspiration" - Brainstorm a solution for your section of the assembly line with a sketch.
"If you Build It..." - Implement a solution for your section of the assembly line.
"Proof is in the Pudding" - Implement a solution for your section of the assembly line that successfully operates with adjacent sections.
"Round and Round We Go" - Iterate on your initial implementation. Explain the challenge you discovered off the first effort and what you did to overcome it.
"Round and Round We Go... Again" - Iterate again on your implementation. Explain the next challenge you discovered with your design and what you did to solve it.
"Videography" - Capture video of the project in action.
"No Soliciting" - Generate at least one item of feedback from other teams relating to your solution for each of the four feedback types (Sustain, Change, Question, Idea).
"Tool Time" - Document an aspect of your solution using our Inventor CAD software. The rendering must include atleast three parts.
"Dimension It" - Label/Dimension your Inventor rendering.
"Lab Rat" - Collect data related to your implementation. Explain what you collected and how you used it.
"Show Me" - Visualize your data in a useful format. Explain your choice of presentation.
"Leave no Trace" - Return your fischertechnik to their appropriate storage locations/clean your work space.


Individual Achievements:
"Share It" - Provide feedback (Sustain, Change, Question, Idea) for another team. Who did you provide feedback to and what was it?
"Keep the Customer in Mind" - Your blog post is formated in a readable, professional manner. Writing is short and concise. Spacing is used to break up thoughts/concepts. Lists and/or bullet points are used as appropriate. No "monolithic" paragraphs.
"Nice One!" - Identify a student from outside of your team that was most helpful to your efforts. Be specific about how they were helpful.
"Helping Hand" - List a student that you helped outside of your team. How were you helpful to them?
"Meta Gamer" - Based on our grading system for this challenge, explain the benefit of earning the class achievements, even though everyone scores them when earned (use math to justify your case).
"And the Winners Are..." - Recognize class participation by selecting one person other than yourself for each of our five activity awards (Initiative, Sportsmanship, Collaboration, Humor, ...what's the fifth one we have up on the board?!)


Level Up!!!:
Capture your experience by posting to your online portfolio. You will have two class sessions (or one block day) to complete these tasks once we've completed our class assembly line design.

Organize your post as follows:
-Title
-Image/Video of class solution.
-Breif overview of challenge.
-Image/Video of your team's solution.
-Breif overivew of how you approached the design of your system.
-Total number of achievements earned.
-Breakout of achievements earned by section (Class, Team, Individual) with appropriate proof displayed (picture/data/explanation/etc.).