Engineering Curriculum at Coronado High School: 2010 - 2014

Tuesday, May 13, 2014

Foam Board Product Design Challenge!


Acme Foam Board Inc. has hired your consultant team to help them improve efficiency at their foam board factory. They would like to reduce product waste by developing a product they can manufacture using waste foam board from their manufacturing process.


Criteria:
  • Identify a customer and develop a foam board product prototype that solves a problem/meets a need. Document your process.


Constraints:

  • Work in teams
  • Two pieces of foam board will be supplied for this project
    • The final prototype may only use one board
  • Additional prototyping/construction materials
    • Printer paper
    • Foam board
    • Tape
    • Glue
    • String
  • Employ at least three of the “d.Think” methods from the Stanford d.School bootcamp bootleg in developing or assessing your design.
    • Link to document TBA. Use google in the mean time.
  • Document your work and prepare a presentation that communicates your experience.
    • Minimum - Narrative: What occurred in your process? What was noteworthy?
    • Bonus - Story: Was there anything unexpected in your experience? The unexpected is memorable.

Tuesday, April 22, 2014

Shopping Cart Challenge: the IDEO Deep Dive

Architecture Capstone Project: Prototype - Architectural Model!


*****All Work Must Be Documented on your Online Portfolio*****


Step 1: Define the scope of your architectural model

  • What does "scope" mean in the context of designing/building a project? Document the definition (1pt)
  • Given your materials, ability and design, what portion of it are you going to physically model?
  • Document the scope of what you plan to build (Important for your instructor score below) (1 pt)


Step 2: Construct your Architectural Model

  • Safety first! Document 3 techniques from our 'How to Cut Like an Architect' video (below) in action (you could take photos of the techniques in action and describe them) (1pt)
  • Choose a scale for your design. The scale should be large enough to show off your work but not too large so that you don't run out of material. Document this scale in your write up and on your architectural model its self. (1 pt)


Step 3: Feedback


  • Client Feedback (3 points):
    • Engage with your client (show them your model) and solicit feedback (+, delta, ?, !). Record at least 3 pieces of positive feedback (+) and 3 pieces of change feedback (delta). 
  • Instructor Feedback (3 points):
    • Did you complete the model according to the scope of the project that was agreed upon? Does your model have a polished appearance?
  • Student Feedback (? points):
    • Gallery Walk!
      • Students will vote via colored post it note for the best build in the following categories (leave a short comment on your note to justify your choice). You may not vote for your own:
        • Pink Post-it: Creativity in Construction
        • Orange Post-it: Attention to Detail (quality of fabrication: cutting, glueing, etc.)
        • Yellow Post-it: Proportion (is there a scale specified and does your model maintain consistency with that scale?)
        • Blue Post-it: Best in Show (your subjective choice for a favorite model)
      • Document any feedback your design receives during our gallery walk.

    The Architecture Capstone Project!

    Goals:
    Develop a design that meets the following Criteria and Constraints...

    Criteria:
    -Develop an architectural solution that solves a specific problem for a client. Your end result will be an architectural model of your design.
    -Create 3 sketches to support your brainstorming effort.
    -Create 2 digital prototypes of your design.
    -Physically construct a prototype (model).
    -Collect feedback from the client at each stage of your effort.

    Constraints:
    -Utilize a design process to solve this challenge:
    ----Define the Problem
    ----Brainstorm Solutions
    ----Digital Prototypes
    ----Physical Prototype
    ----Portfolio Report/Summary of experience
    -All students on a team must meet with the client... this is "human centered" design after all!
    -Clearly identify the design need being met.
    -Use our "four quadrant feedback" technique with your client between each stage of the design process (Define the Problem, between Brainstorming and Digital Prototyping, between Digital Prototyping and Physical Prototyping, After completing your Physical Prototype). Your meetings can be breif, but please solicit feedback and incorporate it into your efforts. Record and list feedback at each stage and list any changes made based off of it.
    -Label at least 3 key features on any sketches you produce.
    -Use Inventor (CAD) on at least one of your digital prototypes. You may use Minecraft to quickly simulate the second digitial prototype.


    Consider the following as you make progress on your effort:
    -Can you utilize any of the "Design Modes" from the Stanford Design School's "Design Thinking" process? Read our post on the "Bootcamp Bootleg" for more info.
    -Can you incorporate any of the architectural concepts that were highlighted by our "Top Ten Architects" lesson?


    The following process may help you achieve compliance with the above design criteria/constraints...

    Process:
    Identify a client
    Discover a design need (interview the client)
    Brainstorm solutions
    -Create 3 sketches of solutions.
    -Call out 3 key features on each sketch.
    Prototype 2 solutions with CAD software
    -Consider 'A/B testing' a key design feature.
    Recieve feedback from your client
    -generate "+", "change", "ideas" and "questions" from both your client and your team.
    Rework/Iterate on your design
    -incorporate feedback into your design.
    -call out features you changed based on specific feedback.
    Build an architectural model that incorporates feedback
    Present model for review
    -generate another round of feedback.
    Write up experience on your online portfolio
    -Share client feedback at each stage of the effort. Communicate how feedback shaped your next effort in the design process.

    Wednesday, April 9, 2014

    Makey Makey Game Controller Challenge!


    Although our Makey Makey Game Controller Challenge deals with building an interface solution for a game, it is actually a game in and of itself! A game format consists of a goal, rules, feedback (and voluntary participation… I guess we’re close to being a game since this is something you’re required to participate in!)


    Project Goal (Criteria): Design and build a custom controller for a web-browser based game*. Iterate on your design to craft the best possible physical prototype (as judged by yourself and your peers)!


    *Game or other browser based interactive content (Drum machine, etc.)


    Project Rules (Specified Constraints):
    • Materials:
      • One Makey Makey controller and accessories including a grounding wrist strap
        • Inventory your items with every class session.
          • Do your inventory immediately upon receipt of your kit!
            • Let your instructor know if you’re missing anything.
          • Inventory your items prior to turning in your Makey Makey
          • Your checked off inventory is your “ticket” out of class. Get it checked before you leave!
            • Your team may not leave until checked. Plan ahead!
      • You may use any of our standard “Design-Build” challenge materials we use in class (straws, paper clips, paper, tape, cardboard, tinfoil, etc.)
        • You must clean your work space and return all unused items to their appropriate location.
        • Select a storage location for any work in progress.
        • Throw out any used materials that are no longer part of your effort and not reusable.
    • Design Process
      • Iterate!:
        • Design, implement, test and rework at least 3 times (iterations).
      • Design Feedback
        • Solicit and receive feedback with each iteration.
        • Feedback Format:
          • Core design feedback:
            • (+) Sustain
            • (delta) Change/Improve
          • Bonus design feedback considerations:
            • (?) Questions
            • (!) Ideas
        • Solicit Feedback:
          • From yourself
          • From your colleagues (team)
          • From your peers (other teams)
    • Document Your Process
      • Select a format that best shares your process and product with the class.
        • If desired, we can spend some class time brainstorming the optimal format for this experience. Up to the class to decide
      • Remember that a picture is worth a thousand words.
      • If a picture is worth a thousand words, what is a video worth?
      • Story is the split between expectation and outcome. What “story element” can you incorporate into your documentation to make it more interesting?


    Project Considerations (Implied Constraints):
    • Choose a game that suits the Makey Makey
      • Easier - choose a game that works with the existing key inputs (WASDFG, click, space, mouse movement)
      • Moar Hacker - reflash the Makey Makey with a custom arduino file for complete control of your keyboard/mouse inputs.
    • Figure it out
      • Ask at least 3 other people before you ask Mr. Olson. Chances are that one of your colleagues has the answer you’re looking for.


    Project Feedback (Score):
    • You gain points for:
      • Documenting a complete (3 iterations) process
      • Building functional prototypes
      • Soliciting Feedback
      • Sharing your process and product in a presentation
      • Scoring well on peer review
      • Having a good attitude
    • You lose points for:
      • Not cleaning your workspace
      • Not completing an accurate inventory
      • Losing materials
      • Having a bad attitude


    Example:
    A possible experience might look like this (everyone’s journey is their own, but this could be helpful in seeing how to work within the specified criteria and constraints):

    • Pick a game you think is fun and promising for this activity
    • Brainstorm some controller ideas
    • Implement a solution
    • Get feedback from your team
    • Re-implement a solution
    • Get feedaback from your team and other members of our class
    • Re-implement a solution
    • Get feedback from a class-wide “Gallery Walk”
    • Prepare a google docs presentation telling the “story” of your process and showcasing your product (you were taking photos and videos at each step)
    • Share this presentation with your instructor/class, parents and friends :)

    Wednesday, April 2, 2014

    Hour of Code

    Anybody can learn to code: A 60 second video from Code.org on how anybody can learn to code 


    I've been hearing a lot about this "Hour of Code" in the last months. I've now finally had a chance to take a look at it and there is some instruction that's very well done. We'll be experiencing this in a few of our courses! I've been doing more and more coding related work professionally and have really enjoyed bringing AP Computer Science into the mix here at CHS. I hope we can start to experience what it is like to think and design solutions programmatically.

    Bridge Building Bonanza Pt1!


    Here are the goal and the rules for our first "Bridge Building Challenge". We will use this experience to make a more robust game to try after it.

    Update: we first attempted a "toothpick" version in 5th period. Now we're attempting a "coffee stirrer" version in 6th :)


    Criteria (Goal!)
    • Build the bridge with the highest strength to weight ratio (most weight prior to breaking vs the weight of the design).


    Constraints (5.5" Coffee Stirrer Version)
    • Bridge may not weigh more than 50 grams.
    • Bridge must span a 12” gap.
    • Bridge must be at least one toothpick length wide.
    • Bridge must be at least one toothpick length in height.
    • No more than 4 stirrers parallel and touching at anyone location.
    • Materials:
      • Construction Materials:
        • 5.5" coffee stirrers.
        • Glue guns and glue.
      • Fabrication materials:
        • cardboard to prevent glue mess.
    • Keep your workspace clean!
    • Clean any messes you make!


    Constraints(Toothpick version)
    • Bridge may not weigh more than 50 grams.
    • Bridge must span a 12” gap.
    • Bridge must be at least one toothpick length wide.
    • Bridge must be at least one toothpick length in height.
    • No more than 8 toothpicks touching in parallel at any point.
    • Materials:
      • Construction Materials:
        • One pack of 800 Count “Royal” toothpicks.
        • Glue guns and glue
      • Fabrication materials:
        • cardboard and wax paper to prevent glue mess.
        • graphpaper to layout design.
    • Keep your workspace clean!
    • Clean any messes you make!

    Tuesday, April 1, 2014

    Life Hacking: Make a Chrome App!

    I'd like to do this in a few of our classes just so we can start to get into the habit of doing little "hack-y" experiences: How to create a google chrome app in less than 5 minutes!

    Monday, March 31, 2014

    4th Annual Egg Drop Challenge!


    We will conduct the 4th Annual Engineering Egg Drop Challenge this week!

    Your goal is to design and implement a solution for our client that allows us to drop an egg from our class balcony onto the concrete below without it breaking.


    The PLTW 12 Step Iterative Design Process (click to enlarge):


    Our agenda for Egg Drop Week (this week) supports an iterative design process:

    Monday is "Prep Day"
    Team up with a partner
    Define the challenge, criteria and constraints.
    Brainstorm solutions.
    Identify materials to bring in for "Build Day" (block day)

    You must bring in the materials you want to use for Block Day!


    Block Day is "Build Day"
    Use the materials you've brought in to realize the vision of your design.
    Crash test dummy eggs will be provided.
    You may test your design off the balcony


    Thursday is "Test Day"
    Click here to see correct drop technique.


    Friday is "Iteration Day"
    Redesign as necessary.
    Reimplement your design.
    Capture your experience in your portfolio.


    Score
    An Achievement System will be used to score your effort on this activity.
    The number one priority in this effort is to not make a permanent mess (no Jello, materials that will stain, etc. If you have any question about materials, please see Mr. Olson).
    Our next priority is to have a great time solving this challenge! :)
    Please note that all materials used in your solution must be "delivered" from the launch location (you may not place additional material on the target from the ground for instance).

    Wednesday, March 19, 2014

    TED Challenge 2014! Part II


    Now that you've picked, viewed and taken notes on a TED Video (TED Challenge Pt I), it's time to move to the second part of the activity.


    You will work with your team. Each student in the group has a unique talk they felt was exciting and relevant to the class.

    The objective of your group is to:
    1) Negotiate within your team to decide which video you'll use to represent the group.
    2) Once your group has agreed on a video, prepare a breif presentation for the class.
    3) Be prepared to present your talk when asked to do so.

    Your presentation should:
    A) Play the TED video your team chose. Be sure to introduce your video. Provide a little bit of context for what the class is about to experience :)
    B) Each team member will prepare a conversation starting question for the class (open-ended "how" and/or "why", not Yes/No).
    C) Explain how a student could get involved in the field in question in the future.

    You will be able to use the class projector to support your presentation.

    Points are awarded for:
    (1 pt) The student who's talk is chosen to represent the group earns a point.
    (1 pt) All the memebers of the group who's presentation is chosen as the best of the class earn a point.
    (3 pts) Each student in the group earns a point for each of the above three presentation criteria (A, B, C) that are met in their talk.

    Food for Thought:
    -Will you argue for your video as the best to earn extra credit for yourself?
    -Or will you support your team by picking a different video that will best help the group's chances?
    -Or are you so sure of your own video that you feel it should be chosen for your group and that it will win the class competition as well?

    Monday, March 10, 2014

    TED Challenge 2014! Part I


    Go to TED.com and spend some time investigating the site.

    Once you've had a chance to familiarize yourself with the webpage, answer the following questions:

    1) What is the TED organization about?

    2) What is the purpose of their website and how does the functionality of their site support that?

    3) As Engineers and Problem Solvers, which topic areas (the choices from the "Show talks related to:" section on the sidebar) are of most interest to us? Justify your answer.

    4) Based on your previous answer, what are 3 talks (videos) on the site that appear like they would be of most interest to you as an Engineer/Problem Solver? Justify your choices.

    5) Each student will watch a unique video (clear your choice with me... first come, first served!). Watch the video. Embed the video in your blog post and create a bulletized outline of the key issues presented in the talk.

    6) How could you get involved in the field/technology/issue you chose to hear about? What experience/skills/training/education would you need to learn to get involved with this field?


    Part II of the TED activity will have you negotiate within a group to select the "best" video to represent the group. The student with the chosen video will recieve extra credit. The group will then prepare a short presentation that summarizes the talk and will present to the class. The class will choose the best presentation and that group will recieve extra credit.

    Monday, March 3, 2014

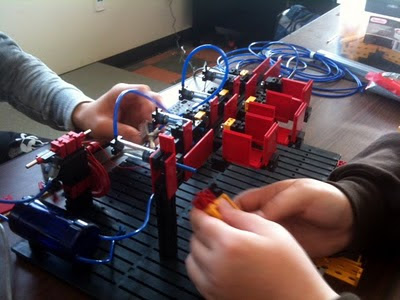
    Machine Control (Robotics!) Capstone Project 2013-14: Marble Sorter Challenge!


    Welcome to our Principles of Engineering Machine Control (Robotics!) Capstone Project for the 2013-14 school year. This is an exciting opportunity to work with your partners to develop a unique solution to an open-ended problem.

    You will earn "Achievements" based on both the process you apply and the product you build. The team that earns the most "Achievements" wins!

    This project is worth 7 points per week we spend on it and is capped at a maximum of 25 points. The top team will earn 100%. The second place team will earn a 92%. The third place team will earn an 89% and the fourth team will earn 85%.


    Process Achievements:

    Organize it!: Title your post and organize it by section in a logical manner.

    Brainstorm!: Provide at least four of your team’s brainstorming ideas for the design solution. This should include brainstorming sketches. Each sketch should include labels and descriptions for communication.

    CAD!:
    Use our Inventor CAD software to model a prototype or your final design. Post screenshots of your model.

    Enter the Matrix: Evaluate your solution ideas (4 minimum) using a decision matrix. Determine the best solution to the problem. Explain your rating system and share insight on why you rated your solutions as you did.

    Design Solution: Create a detailed pictorial sketch or use 3D modeling software to document the best solution, based upon your team’s decision matrix. Your sketch or 3D model should include a rationale for the design selected as the final design solution. Each sketch should include labels and descriptions for communication.

    "I've Made a Few Special Modifications...": Document modifications made to your design during implementation. Explain the reason for the modifications and describe how the new design solution will solve the problem. "Story" is the split between expectation and outcome. Tell us a story regarding what your plan was and how it actually came out! Use photos and sketches to call out three changes. (Nerd points if you know where the quote for this Achievement title comes from)

    Final Implementation: This section will showcase your final hardware and software solution. Include photos of your hardware and program. Call out atleast three key features of your design that were significant to its performance. Report how your solution performed in the challenge.

    Final Implementation - Video!: Embed a video that showcases your solution in action!

    Reflection: Adress the four feedback types that we use in our courses (+, -, ?, !). Solicit feedback from someone outside of your team as well.
    Some questions to consider in this section: How well did you accomplish your objectives? What would your team do differently with your design solution and why? Do the results fulfill the problem statement? Provide a brief explanation of what you learned, the challenges of working in a design team, and the purpose of the design problem.

    Reference: Post a hotlink to material you referenced on the internet. Explain why this information is significant to your project.


    Product Achievements:

    Sorting Speed (15 marbels total: at least 3 different types):
    Process 15 marbles in less than 2:00 minutes.
    Process 15 marbles in less than 1:45 minutes.
    Process 15 marbles in less than 1:30 minutes.
    Process 15 marbles in less than 1:15 minutes.
    Process 15 marbles in less than 1:00 minute.
    Process 15 marbles in less than 45 seconds.
    Process 15 marbles in less than 30 seconds.


    Marble Sorting (Must sort at least 3 types. More than 3 types earns you a multiplier on your Sorting Speed achievements):
    Sort 4 marble types = 2 x earned Sort Speed Achievements.
    Sort 5 marble types = 3 x earned Sort Speed Achievements


    Marble Delivery (may use non-fischertechnik materials to create a "hopper" to drop marbles into for "Drop" achievements):
    Drop marbles from 6" above machine
    Drop marbles from 1' above machine
    Drop marbles from 2' above machine
    Drop marbles from 6' above machine


    Systems (not including motor or piston used to charge your pressure vessel):
    Use at least one piston in a pneumatic system
    Use at least two pistons in a pneumatic system
    Use pneumatics but less than three pistons
    Use at least one motor

    Tuesday, February 18, 2014

    Getting it done!

    Engineering Projects is approaching the "holy grail" of personal/group development. They are becoming a cohesive/highly developed self directed group that is able to apply our "agile development" process to manage their own self designed projects. 

    I think I said about 10 words in class today. Everything was organized/run by our student team. Great job!


    Thursday, February 13, 2014

    Flappy Birds Recommended

    Dong Nguyen, developer of Flappy Bird, recommends the Corona SDK for game development. This is the software tool we've been using in our Engineering Design course :)